A BETTER ANTENNA
![]()
![]()
![]()
![]()
![]()
![]()
![]()
![]()
|
|
FLEXIBLE J-POLE ANTENNA
I recommend consulting your communications guru for help in tuning this antenna. If you have trouble with construction, she or he may be able to help you with that as well. Technically-speaking, this is a 1/2 wave end-fed antenna with a 1/4 wave matching section. This antenna will be very strong and durable-perfect for ground team
abuse. An experienced person could construct this antenna in about an
hour, but it also can make a fun Saturday project. All the materials are
readily available from your hometown Radio Shack, and including tools,
should cost less than $10 to $15. 1. About 5 feet of regular television twinhead wire. It cannot be
foam-filled. It is said to be "300 Ohm TV twin-lead wire."
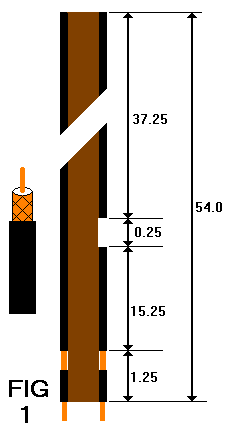
ALL DIMENSTIONS IN THESE DIAGRAMS ARE IN INCHES 1. Take the TV twin lead wire. You must have about 54 inches of it.
Strip half (0.5) an inch of insulation from one end of the wire as in Figure
1. You should now have two copper colored wires protruding out of the
wire. Now twist the wires together and solder them as in Figure 2. If
you've never soldered before, it is actually quite easy. Plug in your iron
and let it warm up. When it is hot, take some solder (rosin core, NOT acid
core) and put it on the tip of the soldering iron. It should melt easily
if the iron is hot enough. This is called "tinning" the tip. Tinning
makes your soldering easier and it makes your iron last longer. Once
you've tinned your tip, put the tip on the twisted wires. The wires will
quickly head up. When they are hot, put the solder right next to the tip
and the wires. The solder should melt and flow into the wires. This only
takes a few seconds: if you keep the iron on the wires too long, you'll melt
the TV wire's insulation. Pull the iron away and let it cool: you're all
done with that part! 2. Now measure 1.25 (1 1/4) inches from the soldered wires and strip some
insulation from both sides. Again, you should have the copper colored wire
exposed as in the first figure. These bare spots are where you will solder
the coaxial cable. Because the coax runs the power from your radio to the
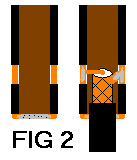
antenna, it is called the "feedline." 3. Now you need to solder the coaxial cable to the wires of the TV twinhead. First you will have to strip the insulation off of the coaxial cable. By definition, coax has two types of wire inside of it. If you peel away the outer layer, you find a copper-colored braided wire that encircles the rest of the wire like a pipe. This is called the "shield." Inside of the shield there is another layer. At the center is a copper wire called the "center conductor." It is covered by a layer of insulation which is white in color. This insulation prevents the two wires from coming into contact with one another. To prepare your coax, take a knife and cut carefully all the way around the cable about 1.0 inch from the end. Pull the black insulation off. You should see the copper shield. Push it back from the end so you can see the white insulator. It may actually look silver because it is often covered in foil. About 0.5 (1/2) inch from the end, again cut all the way around the cable, but be careful to only cut the insulation and not the wire at the center. When you've cut all the way around, remove the insulation. Your coax cable's end should now look like the coax in Figure 1. Take the center conductor and solder it to the left bare wire of the twinhead. Twist the wires around one another and then solder as described in step 2. Take the copper shield and twist the excess up to make a 'wire' that will reach to its respective point on the twinhead. Again, twist and solder. Refer to the second picture of Figure 2. 4. Measure 16.75 (16 3/4) inches from the strips that you cut away. On
the right side, cut out a notch that is 0.25 (1/4) inch wide. You will cut
all the way through the wire at both ends of the notch and remove that
portion of the wire. 5. When you have done that, measure 50.33 (50 1/3) inches from the point
that the coaxial cable's center wire is soldered. If you are tuning your
antenna for 143.90 MHz, leave it a little longer and tune it later. Trim
off the excess twin lead wire (both sides: cut it as a whole) at that point
on the far end. 6. With electrical tape, you should use tape on your coaxial cable to the
rest of the assembly for strength and to keep the antenna weatherproof. 7. At the other end of the coaxial cable, attach a BNC connector. Follow the directions that came with your connector since there are several different types. 8. In the far end of the twinhead wire, cut or drill a small hole. Make a loop of fishing line or parachute cord through the hole. This will make the antenna easy to hang up. 9. The antenna is almost ready for use in the field. This is perhaps the most difficult step--tuning the antenna. You will need some special test equipment to tune the antenna. I recommend getting together with your local communications guru, or ask to borrow her SWR (standing wave ratio) meter. Make sure the SWR meter is for VHF frequencies. Insert the meter in between your radio and the antenna. Briefly transmit on a legal CAP frequency. As I said before, I recommend 143.90 MHz. Using your meter's procedures, determine the antenna's SWR for that frequency. The goal is to get the ratio down to as close to 1:1 as possible. 1.2 or 1.3 to 1 is very good. If the ratio is 2:1 or higher, trim a little bit off of the antenna and try it again. When you trim, trim the top of the antenna and trim it evenly. That is, trim both sides. Also, trim at the gap on the BOTTOM side. You will need to trim in a 3:1 ratio to maintain the 3/4 to 1/4 wave. This antenna design appears in many places and in various forms on the internet. The one that can be found most often is by Ed Humphries, N5RCK (edh@hpuerca.atl.hp.com). He states that the earliest known reference to it was a January 1984 DARC antenna article by James Burks, KA5QYV.
|
This page of the CAP Emergency Services Resources™ website was last updated 02/04/2007
©1998 - 2007 Scott E. Lanis. All Rights Reserved.
 My
very first project as a new ham radio operator was this antenna. If you
follow the instructions, it is very easy to build even for someone like me!
Because it is made of all flexible materials, you can roll it up and keep
it in your pack. If you're in a pinch and need to communicate, you can
then hang it from a tree or anything else high. Because VHF communications
are line-of-sight, you will want to get your antenna as high as possible.
Furthermore, this antenna will perform better and allow more power to go on
the air than will the rubber duck that probably normally use on your
handheld. These plans are for 146.0 Megahertz, but you will probably want
to tune the antenna for 143.9 MHz, the repeater input frequency. Chances
are you'll be able to talk simplex to the airplane but may not be able to
contact mission base--so kick the most power you can on the input to the
repeater. This is a great addition for your handheld radio.
My
very first project as a new ham radio operator was this antenna. If you
follow the instructions, it is very easy to build even for someone like me!
Because it is made of all flexible materials, you can roll it up and keep
it in your pack. If you're in a pinch and need to communicate, you can
then hang it from a tree or anything else high. Because VHF communications
are line-of-sight, you will want to get your antenna as high as possible.
Furthermore, this antenna will perform better and allow more power to go on
the air than will the rubber duck that probably normally use on your
handheld. These plans are for 146.0 Megahertz, but you will probably want
to tune the antenna for 143.9 MHz, the repeater input frequency. Chances
are you'll be able to talk simplex to the airplane but may not be able to
contact mission base--so kick the most power you can on the input to the
repeater. This is a great addition for your handheld radio.