Update: one great idea is to take a roll of unused newsprint
paper and arrange it in a wreckage pattern. Its large, cheap, the
right color, and disposable. I won't do it myself, but some folks will
leave the paper out once their mission is complete because the paper is
somewhat biodegradeable. This is not recommended.
Another variation of the project described below is to use
styrofoam sheets--the kind that are used in construction.
These work very well for providing a basic shape, but can also very
easily blow away. If you elect to try this option, ensure that
you properly weigh down the foam pieces or else you'll be conducting
a SAR for your target... and you won't know where it went!
It is certainly cheaper and not very difficult to construct a
mock aircraft that is very transportable and also very flexible in your
ability to create different wreckage patterns. Here are the items you'll
need:
Staple Gun
8 Twin-Sized Bedsheets
16 2x2" lumber
12 2x4" lumber
Paint to Suit
Nails, Hammer, and other common hardware
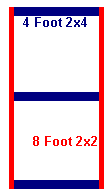
 Build 8 frames as depicted in the third figure. You will have to
cut the 2x4s in half, yielding a total of 24 2x4" by 4'. The overall
dimensions shown here roughly approximate that of a Cessna 172, a very
typical General Aviation aircraft. It makes a good generic target.
Cover the frame (only one side will be necessary, but both sides look
better) with the bedsheets. Keep the sheets tight and don't be stingy
with the staples--they're cheap anyway. When that is completed, paint
the "aircraft" however you like--white is a very common color for
airplanes, so keep the majority of the aircraft the natural color of the
bedsheets. Consider using some black paint and giving parts of the
aircraft a charred appearance. A registration (N-number) number can be
painted on the fuselage or wing(s). One possible scheme is depicted as
part of figure 1. Since either side of the frames can be presented for
identification by an aircrew, you could paint several different 3
registration numbers on different panels. You should display only one
N-number for identification, however. This will prevent unnecessary
confusion. Flip the other parts over so they appear plain white.
Since the target is segmented, it can be displayed in various "crash"
positions (See figure 2). Try to re-create pictures of actual crash
scenes. With permission from the land owner (of course), a four-wheel
drive vehicle can make realistic skid-marks in fields. In wooded
areas, consider some tree-trimming, if allowed. This target makes a
great companion to a practice beacon (practice ELT). The ELT can be
placed on, under, or around the target. Consider placing aluminum foil
or other sheet metal in or around the target to create realistic
reflections with the practice beacon. Random "junk" can also litter
the "crash site" to add to realism. Again, look at pictures from real
accident scenes to gage what type of items would be realistic.
Adequate precaution should be used when setting out this--or any
other--practice target. In the past, actual missions have been
generated from simulated distress signals that were intended to be used
strictly for exercise. Notify the local Flight Service Station
(1-800-WX-BRIEF) as to the location, timeframe, and nature of your
targets--whether they be electronic, visual, or otherwise. Most
importantly, ensure that you remove, dismantle and store your targets
when your exercise has terminated. For additional information on false
alarms related to this type of target, see SAR WARS STORIES
#18, "A
False Find."